26 June 2012

Recipe No. 30 - Simply Good Apple Pie

We all cheat once in a while, then I often justify it to myself in a million and one ways. For example..Im on a diet but I took the stairs instead of the lift so I am allowed to eat these crisps.

With this recipe I cheated slightly - BUT the recipe said so! I used shop bought pastry as it was so hot when I made this I really didnt want to be slaving making puff pastry. as I said the recipe stated I could use shop bought pastry!!

So this really couldnt have been simpler, I peeled and chopped the apples, combined them with sugar and lemon and then placed them in my pie dish, Rolled out the all butter pastry and laid it on the top.
It was just before the Jubilee (apologies for the late post!), and I added a little pastry crown on the top that I got the cutter for from Cake Decorating magazine :)


Simple just as the title suggested.

Then I served it with Clotted cream - YUM. It was delicious. I thought at first it might be bland as it had no other flavour than the apples lemon and sugar but it was lovely. Very British.

17 May 2012

Recipe No. 29 - Coconut Macaroons

At work we have a brand come in occasionally called Mrs Crimbles, who make Gluten Free products. My friend loves their Coconut Macaroons and as soon as we get some in he makes a beeline for them. At the weekend he completed a charity event called Tough Mudder in which he endured a 12 mile obstacle course to raise money for charity.
I promised to make him something nice as a treat for completing it so that is how I chose this recipe!

This is literally the simplest recipe ever! the only fiddly bit is trying to get the macaroons into a neat and tidy pyramid. This didnt happen to mine - they look more 'rustic' !!

The coconut milk, beaten egg white, and sweetened shredded coconut is mixed together and left for half an hour - thats literally it!


Add caption
After that time the mixture is formed into the pyramids that the book suggested, Now whoever did the ones in the book is an absolute genius..they are small and perfectly compact! Mine were more small piles of coconut in a roughly pointed shape!

These are then baked for 25 minutes until the peaks are firm and browned.
Once they've been left to cool melt the chocolate and then drizzle over the top. Finished!


These went down really well, they weren't overly sweet and were still moist in the middle - Perfect with a cup of tea! And ignoring the waiting time in between cooling, cooking, standing time, took no more than 35minutes to make!


15 May 2012

Recipe No.28 - Chocolate Chunk Cookies

I can't believe I haven't written this entry yet! I completely forgot!

These were a bit of a last minute bake and I wanted to try out the Stork easy mix baking liquid.


These cookies were a simple mix-it-all-together recipe so in went the flour, nuts, chocolate chunks, sugar and last but not least the Stork. I was advised that this doesn't work for cookies where you are required to roll out the dough. The stork is easy to measure out and even easier to mix in.
However the mixture is a very sloppy consistency - which as I mentioned is fine for this type of recipe.
This was spooned (dripping all over the place) onto the lined baking sheet.
15 minutes later and I pulled these out of the oven.
The nuts made a lovely crunch in the soft chewy cookie texture.

After the relative success of my first go at using the Stork Liquid I made cup cakes with it. They came out nicely and tasted like they normally do however the mixture was very sticky and runny. I do think it is a great idea and for some recipes it is easier to use but in future i'll be sticking to proper butter!!!

23 April 2012

Recipe No.27 - Strawberry and Pistachio Tart

Strawberry and Pistachio Tart, requested by work!
This requires very little actual baking but is very time consuming.

First the pastry is made including ground pistachio's to give it a lovely nutty flavour, after 30 minutes chilling it is rolled into a circle and pricked all over with a fork. In the book it suggested pinching around the edges to give a fluted look which I attempted. Before baking it looked nice but during the baking the edges blurred slightly.

After the pastry base was cooked and cooled I hulled the strawberries and heated the raspberry jam, these are then placed on the base and the glaze brushed on, finally topping with chopped pistachios.

I didnt really enjoy making this for some reason, I think it was because it didn't involve doing very much and I kept having to stop and start waiting for it to chill, cook, cool etc.


However it did taste really nice and was good to have some fresh fruit to make me feel less guilty about eating it!

8 April 2012

Recipe No. 26 - Simnel Cake

Happy Easter Everyone!

I've been a bit busy this week so am finally getting around to typing up about the Simnel cake I made on Monday.
Prior to actually making this cake I've never tried Simnel Cake but this blog - and the up and coming Easter weekend has given me that little push in the right direction. I don't know why I've never actually tried it as I love both fruit cake and marzipan but anyway...

Ok so this starts out as a relatively simple fruit cake, however whilst you are filling the tin with the mixture when it reaches halfway a layer of rolled out marzipan is placed on top and then the remaining mixture added. This is baked for 30 minutes at a higher temperature and then at a lower for an hour although I think in future 50 minutes would suffice for my oven.
The cake is then left to cool for about 2-3 hours. Once cool heated apricot jam is spread on top and a layer of marzipan is added along with marzipan balls to represent the disciples. This depends on your opinions of Judas whether you add 11 or 12 balls. I went with 12 but only because it was easier to space the balls evenly. Diagonal lines are scored across the top and the cake is placed under the grill to brown the marzipan.


 Diagonal lines are scored across the top and the cake is placed under the grill to brown the marzipan.


Finished!

This cake was lovely, not too heavy and the layer of marzipan keeps the centre of the cake nice and moist.

1 April 2012

Recipe No. 25 - Double Chocolate Chip Cheesecake

I....LOVE...CHEESECAKE.


Whenever I go out for dinner I can never resist a cheesecake, I can be so stuffed the thought of food makes me sick but as soon as that waiter offers me a Dessert Menu and I see a cheesecake (Lemon in particular - but i'm not fussy!) I HAVE to have it.

I especially love a baked cheesecake with a nice buttery, crumbly biscuit base. This cheesecake had 2 types of chocolate, both milk and white. First of all the digestives need to be bashed into crumbs unless you have very little stress in your life in which you can do it in a food processor. This is mixed with melted butter and pressed into the base of a spring form tin then placed in the fridge while the filling is made.

The cream cheese, sour cream and sugar are beaten together then the sugar, vanilla and eggs added and the whole gloopy mess is poured over the base and baked for approximately an hour. After that the oven is switched off and the cheesecake left inside to cool to reduce the chances of cracking across the top.


This went down really well, It wasn't exceptionally sweet although some people may find that the dark chocolate chunks are a bit too bitter in which case a chocolate with a lower cocoa content could be used. I used a 74% bar. Other than that its lovely with a nice helping of cream or creme fraiche.

20 March 2012

Recipe No. 24 - Chocolate Fudge Hot Pot Pudding

This recipe is the ultimate comfort food when its cold outside and you can't wait to get home to something rich and gooey.

The recipe is amazingly simple, all of the ingredients are combined and added to a well greased dish.
Then this next bit seems so odd to me, coca powder and hot water are combined to make a thin, watery chocolate sauce and it is poured over the mixture.

The dish is put in a hot oven for about 35 minutes so that it is still runny at the bottom and served with ice cream or cream.. This went down so well and served slightly more than recommended - and we were not scrimping on the portions! I'd say it served about 9, 5 the first day and then I kept it in the fridge overnight. The next evening I poured a little more hot water over the sponge to keep it moist and heated it in the oven at about 180c for 15-18 minutes and it came out just as nice as the day before!


Happy Baking! xx

6 March 2012

Recipe No. 23 - Zebra Shortbread

Shortbread strikes me as tricky, It seems easy but its all in the baking time. Not long  enough and it could be soft, too long and it will be too hard.

This looked so nice because of the stripy pattern of dark and white chocolate.
First of all the dark and white chocolate are melted and left to cool, then meanwhile the butter, sugar, flour and egg are combined. The mixture is then split in half, half is mixed with the dark chocolate and the other half combined with the white chocolate.
Both of the clumps of dough are then sandwiched in between 2 sheets of clingfilm and rolled into rectangles and chilled.
After half an hour the 2 sheets of dough are pressed together. The edges are neatened and then the rectangle is cut into 3 and they are stacked up to form one large stripy brick, this is left for another 30 minutes in the fridge

I had to cook mine in batches and the second batch was chilled for about 10 extra minutes which made all the difference, the lines between the layers were much sharper.

The brick is thinly sliced, placed on baking paper and cooked for 10 minutes. Once cooked they must be left to cool on the sheets for a few minutes before being transferred to a cooling rack.


You can see the biscuit on the right at the front is smudged whereas the on the left the lines are clearer


I will definitely bake these again as I think they were slightly under baked, another minute would probably have made them more crunchy when they had cooled.

1 March 2012

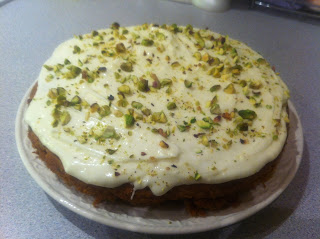
Recipe No. 22 - Carrot and Pistachio Cake

I love eating Carrot cake. I hate making Carrot cake.

The things I hate about it are:
1. Grating the Carrot, It takes forever and you keep thinking you've done loads more than you actually have. Also you always end up grating a little bit of your fingertips if you stop concentrating for me than a second.

2. Using oil instead of butter really brings it home just how bad it is for you. I think I hate using oil too is because it doesn't taste very nice on its own whereas butter does :)

So you pretty much just cream the butter and sugar as usual and then add all of the other ingredients to the bowl, mix and bake for 45 minutes. It is quite time consuming due to the grating but other than that it is very simple and easy. After it has cooled you mix the cream cheese, icing sugar, butter and lemon zest together and top the cake with it.

I cooked the cake in a round tin rather than a traditional square tin, I took some to work and the rest disappeared by the next evening. It was delicious and the pistachios made a really nice change to walnuts.


The only downside to this cake is making room in the fridge, It has to be kept chilled due to the cream cheese in the icing. xx

27 February 2012

Recipe No. 21- Sticky Orange Marmalade Cake

I had a busy weekend this week and was away from Friday to lunchtime on Sunday so I just wanted to bake something quite quick and simple.

This was so easy, literally the butter and sugar are creamed, then the eggs and then flour added and then a final addition of a good quality chunky seville orange marmalade.

It all went into 1 tin so I didn't even need to sandwich 2 sponges after it had cooked! When it is taken out  of the oven and removed from the tin, more marmalade is heated and brushed over the surface and then it is left to cool. Then a simple glace icing is drizzled over the top and left to harden.

This went down a treat and nearly the whole cake was eaten in about 2 hours! I promise to make something more adventurous tomorrow!


20 February 2012

Recipe No. 20 - Lemon Iced Biscuits

Cupcakes didn't seem to go down too well in my new office, I'm the only girl and the other 4 are all men but still, Who doesn't enjoy the odd cupcake or 3?!
This weekend I made biscuits instead thinking maybe that would win them round! I also had a few lemons to be used up so I made Lemon Iced Biscuits.

In the past I always tend to have trouble with overbaking biscuits as I worry that they are undercooked.
So I was brave and stuck to the timings given and voila! Light biscuits with a good texture - nice and crumbly. I also retained a certain amount of girlyness with a heart shaped cutter!

Then I iced them with a simple Glace Icing made with icing sugar and lemon juice, I didn't go for anything too difficult because I like everything to look relatively uniform and simple.


A very simple blog post for a simple recipe!

19 February 2012

Recipe No.19 - Paul's Pork Pies with Quails' Eggs

I like to look up a few tips online before starting a recipe that I've never tried before, and I read somewhere that these are a 'labour of love' because they are so time intensive. They were not wrong, this isn't something you whip up when people come round. It has to be a well thought out and planned ahead. Not my best attribute.

So first of all the Hot water pastry - eek! This was really odd, the butter and the flour are combined to make breadcrumbs whilst the kettle is boiled and the lard melted. The lard, water and salt are mixed together then added to the flour, The mixture is stirred to a dough and then you use your hands to make sure it is all combined, then whilst the dough is still hot, it is rolled out and shaped into the muffin tin and the lids and put in the fridge to chill whilst you make the filling.

The filling is made of bacon, pork, onion, parsley and then seasoned. Oh and I forgot meanwhile my mum peeled all of the Quails Eggs which I boiled earlier! The pastry cases are then half filled with the pork filling, an egg is placed in the middle and the rest is topped up with more pork mixture. The lid is added and then a hole made with a piping nozzle to allow steam to escape and the gelatine to be added later.


The pies are cooked for 40-45mins and then removed from the oven and their tin. Easier said than done. I used a silicone Muffin Tin so that I could push them up from the bottom and then lift them out.

After allowing them to cool a mixture of gelatine and chicken stock is made and then poured through the hole that was made in the lid.

The Pies are then refrigerated overnight (see, not a last minute addition) and then they can be enjoyed!!

Yum!

11 February 2012

Recipe No.18 - Cherry Bakewell Cupcakes

First of all, sorry I've been absent for a while I started a new job this week and haven't had the time to do any baking. So this afternoon I made the Cherry Bakewell Cupcakes.

The sponge recipe for this is really simple and contains ground almonds to give it a light flavour.
Once the cakes are cooked and cooled an apple corer is used to remove the centre which is discarded (or eaten!) and raspberry jam is spooned in.
Glace Icing is poured over the top and a Cherry added. All the steps are simple but it is a little time consuming.

 Cooling down.
 Filled with jam, ready to be iced.
Finished!
Jam in the Centre.


These make such a nice change from little cakes with loads of buttercream which look pretty but obviously have a lot more calories!

5 February 2012

Recipe No. 17 - Devil's Food Cake

A Chocolate Cake for a Cake-o-holic's 25th Birthday. Devil's Food Cake.

This recipe is quite an extended recipe. It has quite a few components that are combined in a specific way.
First of all cocoa powder, bicarbonate of soda and boiling water are combined forming a chocolaty liquid and left to cool. A bar of 70% Chocolate is melted and left to cool too. 
Meanwhile the butter is creamed and sugar added gradually along with eggs and vanilla (I use the one from waitrose thats in a small pot and is like a thick paste with the seeds in too). The Flour is then sieved and folded in in 3 parts alternately with sour cream (sounds odd). Then all of the cooled mixtures from before are slowly added. This is baked in 3 tins and left to cool. 

The filling and topping was made by melting more 70% chocolate and combining with even more sour cream however I didn't particularly like the bitter strong taste so I added icing sugar too. The tiers are then stacked and smothered in the chocolatey glue but it looked a bit higgeldy piggeldy so I removed one tier (Don't worry it won't go to waste!) This was probably for the best as the whole things needs to taken to the birthday recipient! Finally I melted white chocolate and drew a 2 and a 5 on some baking paper sellotaped to a tray, then once they were dry carefully peeled them away and placed them on top.


I'm the first to admit that it's not the prettiest cake I've made but it is by the far the chocolatiest! Its really moist, smells amazing and is supposed to improve after a day (although who could wait that long?!) It's got that great dark colour, I'm sure there will be requests for this time and time again!! 

Recipe No. 16 - Perfect White Loaf

I love fresh bread for breakfast with strawberry jam on, or for lunch as part of a nice sandwich but I never think far ahead enough to make it in time for lunch let alone breakfast so last night I made a 'Perfect White Loaf'

The recipe states that it makes 2 medium loaves so I halved it to make just 1. Luckily when I first left it to rise The Jonathan Ross Show had just started to that hour flew by and then for the second hour of rising time I watched a programme about all the old talent shows like Popstars: The Rivals rekindling my love for Darius Danesh (Best Audition EVER!)

So the Loaf cooked for half an hour and then I took it out and went to bed, this morning I had Bread and Jam for breakfast and then a Bacon Sandwich for lunch..Perfect after a snowy trip to Tesco!

A great, simple recipe. Just don't start on it after 9pm if you're tired!

3 February 2012

Recipe No.15 - Oat and Raisin Biscuits

Today I was in the mood for some nice chewy biscuits, so I made the Oat and Raisin cookies. I rarely make biscuits and I'm prone to over baking them as I worry that they are underdone as they're so soft when you take them out of the oven.

Oat and Raisin are my favourite type of biscuits, much more than chocolate or ginger for example.
The Book states that these are 'Easy for kids' and that is accurate! The butter and sugar are creamed, the egg,milk and vanilla beaten and added to the butter/sugar mix and finally the flour, oats and raisins are added to the bowl. This makes quite a stodgy dough which is baked for about 13minutes.
When you take the cookies out of the oven they are still really soft but they firm up after about 5 to 10 minutes.

These are delicious as the vanilla really comes through, in future I would probably add a touch of cinnamon in too.

Without a doubt will be making these again as they are so quick!

Happy Baking! xx

1 February 2012

Recipe No.14 - Paul's Iced Fingers

Who isn't transported back to childhood when they eat an Iced Finger?
They are something that a lot of people associate with a trip to the bakers with their mum or dad.

On the Tv series these were one of the technical bakes, and now I can see why! It is so hard to get the buns to look the same once they have been baked, Iced and filled.

The dough for this at first seemed quite odd as it has milk and butter in it making for quite a yellow dough rather than a pale or white dough. This is left to rise and then cut into equal pieces and formed into sausage shapes and left to rise for the second time.

The oven has to be really hot as they only need to be cooked for 10 minutes and here is where I went wrong. First of all I left too much space between the buns so that when they cooked they were all separate rather than slightly joined in a line. This meant that each had a - albeit soft - crust all over the bun rather than just the top. Second of all I checked on them after 8 minutes and they were a lot browner than I wanted them to be, in the words of Paul Hollywood 'a slight overbake'. So they cooked quicker in my oven and didn't look as pale as I wanted, they appear like they would have a hard crust but they were still soft thankfully.

Now Icing, this again is so hard to make all the buns look even and I wish I had done as Mary-Anne did on the series and piped the Glace Icing on to achieve a Uniform look but instead I stuck to the book and dipped the buns and left them to dry.

Meanwhile the jam is warmed and sieved to remove any pieces of fruit and the seeds, Then the whipped cream and jam can be added. They are best eaten soon after filling so I took some over to my neighbours so as not to eat them myself!

I would definitely make these again as they are such a memorable treat! Just in future I would keep a close eye on them whilst in the oven!


Waiting to be filled...
One for me!

28 January 2012

Recipe No. 13 - Sticky Walnut Tart

Hmmm 13 is often considered unlucky and maybe in this case I think it could be true.

So far this is probably the only thing I wouldn't make again, The pastry for the tart was really nice and I had a little left over which was enough to make 2 little jam tarts. It was hard to roll out as it is quite short but I lined the tin with it in the way Mary Berry did on one of The Great British Bake off explanation episodes where she rolled out the dough into a large circle and folded the side into the centre. After that the edges that had been folded in were stood up and pressed into the sides - Very hard to explain! So I've found it on youtube, watch this video from 3minutes in to see what I mean:

Whilst the pastry is blind baking, the filling is made by placing all except the cream into a pan and heating to melt the sugar and butter. When this has happened the cream is added and left for a minute or two more. This is then poured into the tart base and cooked for about 15 minutes. 

Now it looks nice, and smells nice however the filling was just a bit too sweet, too syrupy and dare I say it.. too walnuty?! Im not the biggest fan of walnuts but I don't dislike them, the filling was pretty much just walnuts in a very sticky glue made of honey, sugar, butter and cream. Now to me I don't think this was worth the calories! Give me any other dessert but if it's a lot of calories I want to at least enjoy every single last mouthful! 

So, If you like Walnuts and things sweet enough to make your eyes water...Make this!! 


26 January 2012

Recipe No. 12 - Banana and Almond Slice

Don't you just love walking into a warm house that smells like cake? I do!
Especially if it's Banana flavoured as my mum used to make Banana and Walnut loaf quite a lot. Also..you do almost feel a little bit healthy as the cake has fruit in!
As you might have seen Holly (recipes from a normal mum) posted a tip today about freezing those bananas that are past it so that you can make banana cake/loaf when it suits you and not just when you have an abundance of shrivelled black bananas.

Well that is exactly what I did just before christmas, there were way too many other things to eat in our house to even think about making a Banana cake so I peeled, mashed and froze them until this morning. They take very little time to defrost too which is great!

This cake came out so moist and delicious, it's not overpowering and is light almost like a sponge cake. The almonds on the top and bottom give it a really nice crunch. Perfect when it is still slightly warm out the oven. It also makes quite a lot, about 20 squares so great for making ahead of the weekend!

In future I would quite like to try a few variations, maybe with chocolate chips or with flaked almonds in the cake mixture too rather than only sprinkled into the tin before the mixture is added and sprinkled on top, maybe even a little Honey would be nice in it! all in all a very versatile cake!


24 January 2012

Recipe No.11 - Very Lemony Cupcakes

Today is my dad's birthday and also my sister's friends 18th so we made them cupcakes (sorry dad you got pink ones too!)

I used the Very Lemony Recipe, I've never made cakes with buttermilk before and I thought they had an odd almost crust on the top..It wasn't hard but just a denser texture than the inside of the cake. They had a light lemony flavour. 
Harriet helped with the decorating by using a flower cutter from hobbycraft to cut roll out icing and then sticking a pale pink pearl on the top using glace icing whilst I piped a pink and cream swirl. This is achieved by lining the inside of the piping bag with food colouring and then putting the buttercream in. I was really pleased with the result! And so were the Birthday recipients!! 


I liked these very much however I think in future I will be sticking to my Delia Sponge recipe as I preferred the texture and they rise better too! 


Waiting to be Iced.


Sugar Flowers Drying.

23 January 2012

Recipe No.10 - Chocolate Crackles

Last week an empty tin was left on my mum's desk at work...as a hint! My mum's colleagues know I bake and from time to time I supply them with cupcakes, this time I thought I'd do something a bit different and make cookies.

Before cooking the dough is rolled into a ball - similar looking to a truffle - and rolled in icing sugar. As they cook the ball flattens and then as they change shape the icing sugar cracks. These cookies look nice and all crack in a different way so they look quite interesting. This is a really simple recipe although I did have to batch bake in order to cook them all which is a bit time consuming. I also got to use my new cake stand which was a bonus!


Some in a tin for Mum...The others can stay at home with me!

20 January 2012

Recipe No.9 - Monkey Bread

Don't you just hate it when you wake up and you feel rubbish, the weather is rubbish and all you want is a nice hot drink with a slice of something comforting. So, 3 cups of hot Ribena later I decided to make some Monkey bread as the thought of it warm out the oven was very comforting! (The recipe also said it was simple and great for kids which meant it couldn't be too difficult!)

First of all you make the bread dough and leave it to rise, then it is separated into 60 blobs and rolled into melted butter, sugar, pecans and cinnamon. These are placed in a loaf tin (or 2 as the recipe makes quite a lot of dough) and left to rise again before baking.

The sugar and pecans all caramelise and join all the little pieces together. Heavenly!

No Problems or changes necessary! A very simple and delicious recipe that would go down a treat at any time of the day! x


19 January 2012

Recipe No.8 - Chocolate and Orange Mousse Cake

This was definitely a Labour of Love!
It was for one of my best friends birthday (Alex). I told her that she had to pick a cake out of my recipe book this year and she chose the Chocolate and Orange Mousse Cake.
This cake uses a LOT of ingredients including 13...yes 13!... eggs, and it also take quite a lot of preparation time and a wide variety of bowls, tins and utensils. However the result is definitely a crowd pleaser!

First all to make the orange swirls within the chocolate sponge you make an orange coloured paste which is piped onto a lined baking tray or 3 ( somehow you have to fit these into your freezer!) and then move onto the chocolate sponge which has 4 egg whites and 4 whole eggs in it. Meanwhile the orange paste will have become solid so you layer the chocolate mixture over the top and bake for 5-7 minutes. I was not brave enough to take mine out after 7 minutes so left them for a further 2 which I don't think harmed them! These sheets are then turned out and left to cool.

Once cool the sheets are cut into 2 lengths to become the sides and 2 circles which form a top and a base,  I lined a springform tin with one of the circles and both of the sides and packed it all up and drove down to Bournemouth which is where Alex lives ( I was worried the Mousse might not survive the 2 hour journey).

Once there, melted chocolate, more stiff egg whites, egg yolks, gelatine and orange juice and zest are combined to form the mousse. This is poured into the cake lined tin, the sponge lid is added and the whole thing chilled to set. I left it overnight. Finally the next day, I turned the whole thing out onto a plate which was surprisingly easy as the gelatine in the mousse produces quite a stable mass. All that was left was to heat arrowroot and orange juice to form a glaze for the top and after yet more chilling! Using a star shaped nozzle pipe the cream around the top to hide the join between the sponge sides and lid.


This was delicious, it was a cross between a cake, a mousse and a Terry's Chocolate Orange, the surprising middle accompanied by pretty swirls on the sponge (which is not very sweet making it less sickly) make it very impressive looking.  I already have another date in mind this year to make this again!
lastly, if you attempt to make this I have 3 tips:
1. Make sure you have plenty of room in your freezer,
2. Set aside a lot of time and get the necessary bowls etc out before hand,
3. Make sure you have a lot of people coming to eat it, otherwise you will end up eating a lot of it yourself!